Writing a resume in groff can seem difficult, but rest assured it can easily be accomplished, and in this guide I will show how a simple resume can be created. In this guide I will use the macro set ms, so remember to compile the document using -ms. This guide will also use the tbl program to create tables, so remember to first compile the document in tbl.
Settings
To begin with, let’s add some settings in the head of the document.
.fam T
.nr PS 10p
.nr VS 15p
.ds CH
In the section above, we have specified the font family T (Times), a point size of 10p, a line spacing of 15p and also disabled the page numbering (by letting the center of the header be blank).
Coloring
Next, let’s define some of the colors that we are going to use later.
.defcolor headingcolor rgb 0.5f 0.5f 0.5f
.defcolor linecolor rgb 0.6f 0.6f 0.6f
Above the headingcolor will be used for a horizontal ruler under each heading. The linecolor will be used for a vertical line in each section (more on that later).
Macros
To avoid a lot of typing for each heading, we will create a macro instead.
.de heading
.   nf
.   ps 14
.   B "\\$1"
\h'0n'\v'-1.2n'\
\m[headingcolor]\
\l'\\n(.lu\(ul'\
\m[default]
.   ps 10
.   sp -.2
.   fi
..
In the macro heading above, we start by telling groff not to fill output lines. We set the point size to 14, print the input parameters in bold, and then continue by drawing. When drawing, we first move horizontally to the position 0n, then move vertically up 1.2n and change the pen color to the previously defined headingcolor. After that, we just draw an underline \(ul from where we are to the most right of the document’s writing area. Finally, we change the color back to default, revert the point size back to 10, decrease the vertical spacing by 0.2 and tell groff to once again fill output lines.
Header
Every resume needs a detailed header with name and contact information.
.ce 2
.ps 18
.B "John F. Smith"
.ps 10
john.fictional.smith@mail.com
.TS
tab(;) nospaces;
l rx.
Main Road 66;
Awesometown, 66788;T{
.I "+12 42 99 666"
T}
Wonderland;T{
.I "https://my-little-page.com"
T}
.TE
In the example above, we tell groff to center the following two lines where we print the name John F. Smith (with a point size of 18) and his email address (with a point size of 10). Then we create a table using .TS (table start) and ending with .TE (table ending). We specify the tab separation that will be used to separate each cell as ; and instruct tbl to ignore spaces. The format of the table is l rx. which means that the first cell is left aligned, the second cell is right aligned and extended (to fill the writing area), and the dot tells tbl to end the format there.
The contents are then specified with each row on one line (with some caveats) and cells separated using ;. As we tell groff to use italics .I on the phone number and the URL, we must tell tbl to treat the content as text blocks using T{ and T}. T{ must come after the ; and T} must be on its own line.
A short summary
We will, of course, need a short summary in our resume. You can, of course, write whatever you want here, and not necessarily lorem ipsum dolor sit amet…
.heading "Summary"
.LP
Lorem ipsum dolor sit amet, consectetur adipiscing elit, sed do eiusmod
tempor incididunt ut labore et dolore magna aliqua. Ut enim ad minim
veniam, quis nostrud exercitation ullamco laboris nisi ut aliquip ex ea
commodo consequat. Duis aute irure dolor in reprehenderit in voluptate
velit esse cillum dolore eu fugiat nulla pariatur. Excepteur sint occaecat
cupidatat non proident, sunt in culpa qui officia deserunt mollit anim id
est laborum.
In the example above, we have taken advantage of our macro named heading to format the heading Summary. As a placeholder for our paragraph .LP we have just added the standard Lorem Ipsum passage, used since the 1500s.
Sections
Finally, we create some sections for our various topics in the resume. These can, of course, vary depending on the person or position in mind. I will just create some examples.
.heading "Professional Experience"
.TS
tab(;) nospaces;
rW15|lx.
\m[default]2019 - today\m[linecolor];T{
.B "Development Engineer at Creative Pros"
\(en Awesometown, Wonderland
.br
Sed ut perspiciatis unde omnis iste natus error sit voluptatem accusantium
doloremque laudantium, totam rem aperiam, eaque ipsa quae ab illo inventore
veritatis et quasi architecto beatae vitae dicta sunt explicabo.
.sp .5
T}
\m[default]2010 - 2019\m[linecolor];T{
.B "Professional Expert at Dreamworx"
\(en Somefareaway, Neverland
.br
Nemo enim ipsam voluptatem quia voluptas sit aspernatur aut odit aut fugit, sed
quia consequuntur magni dolores eos qui ratione voluptatem sequi nesciunt.
.sp .5
T}
.TE
\m[default]
In the example above, we are once again using the macro heading to create a new heading for our experiences. The content is rendered inside a table, but this time the table formatting is a bit different. In this case, rW15|lx. means that the first cell is right aligned with a fixed width of 15 (you might have to change this to work for your resume). The two cells will be divided by a line, specified using the |, and the second cell will be left aligned and extended (to fill the writing area).
Here we use the previously defined color linecolor for printing the separation line. First we make sure the default color is selected, then we define the first cell (here containing a date) and then set the new color linecolor. For our content, we once again use a text block to enable us to use formatting and longer texts.
In our text block, we first define the position, employer, and location, separated with an en dash. We break the line using .br and add some descriptive text for the position. Finally, we add some vertical spacing with a value of 0.5. After the table is ended, we make sure the default color is set.
Conclusion
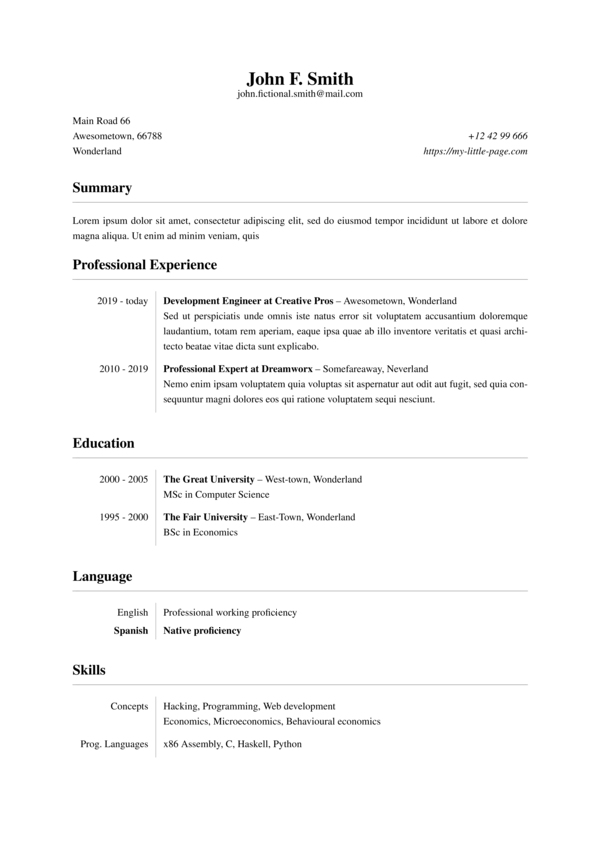
Together with all the information above, we can now create a final document to compile into our resume. I’ve created a template blow based on this guide. Feel free to use it and change it in whatever way you want.
.fam T
.nr PS 10p
.nr VS 15p
.ds CH
.
.
.defcolor linecolor rgb 0.6f 0.6f 0.6f
.defcolor headingcolor rgb 0.5f 0.5f 0.5f
.
.
.de heading
.   nf
.   ps 14
.   B "\\$1"
\h'0n'\v'-1.2n'\
\m[headingcolor]\
\l'\\n(.lu\(ul'\
\m[default]
.   ps 10
.   sp -.2
.   fi
..

.ce 2
.ps 18
.B "John F. Smith"
.ps 10
john.fictional.smith@mail.com
.TS
tab(;) nospaces;
l rx.
Main Road 66;
Awesometown, 66788;T{
.I "+12 42 99 666"
T}
Wonderland;T{
.I "https://my-little-page.com"
T}
.TE

.heading "Summary"
.LP
Lorem ipsum dolor sit amet, consectetur adipiscing elit, sed do eiusmod tempor
incididunt ut labore et dolore magna aliqua. Ut enim ad minim veniam, quis

.heading "Professional Experience"
.TS
tab(;) nospaces;
rW15|lx.
\m[default]2019 - today\m[linecolor];T{
.B "Development Engineer at Creative Pros"
\(en Awesometown, Wonderland
.br
Sed ut perspiciatis unde omnis iste natus error sit voluptatem accusantium
doloremque laudantium, totam rem aperiam, eaque ipsa quae ab illo inventore
veritatis et quasi architecto beatae vitae dicta sunt explicabo.
.sp .5
T}
\m[default]2010 - 2019\m[linecolor];T{
.B "Professional Expert at Dreamworx"
\(en Somefareaway, Neverland
.br
Nemo enim ipsam voluptatem quia voluptas sit aspernatur aut odit aut fugit, sed
quia consequuntur magni dolores eos qui ratione voluptatem sequi nesciunt.
.sp .5
T}
.TE
\m[default]
.heading "Education"
.TS
tab(;) nospaces;
rW15|lx.
2000 - 2005\m[linecolor];T{
.B "The Great University"
\(en West-town, Wonderland
.br
MSc in Computer Science
.sp .5
T}
\m[default]1995 - 2000\m[linecolor];T{
.B "The Fair University"
\(en East-Town, Wonderland
.br
BSc in Economics
.sp .5
T}
.TE
\m[default]
.heading "Language"
.TS
tab(;) nospaces;
rW15|lx.
English\m[linecolor];T{
\m[default]Professional working proficiency
.br
.sp .2
T}
T{
\m[default]
.B "Spanish"
\m[linecolor]
T};T{
.B
\m[default]Native proficiency
.R
.br
.sp .2
T}
.TE
\m[default]
.heading "Skills"
.TS
tab(;) nospaces;
rW15|lx.
Concepts\m[linecolor];T{
Hacking, Programming, Web development
.br
Economics, Microeconomics, Behavioural economics
.br
.sp .5
T}
\m[default]Prog. Languages\m[linecolor];T{
x86 Assembly, C, Haskell, Python
.sp .5
T}